omp: from zero to /vibe
- date
- playtime
- 00:13:00
- location
Install, theme, providers, models and /vibe: a walkthrough of my omp setup on macOS, Linux and Windows.
First real post here, and it’s the tutorial I wish I’d had: going from zero to my omp (oh-my-pi) setup, configured and good-looking, step by step. Everything was checked against omp’s docs and CLI (18.12.5 here; the Linux path was tested in a clean Ubuntu 24.04 container, which installed 18.12.6).
| Step | macOS | Linux (Debian/Ubuntu) | Windows |
|---|---|---|---|
| Package manager | Homebrew | apt | winget |
| Terminal | Warp (mine) | Warp or any terminal with a Nerd Font | Windows Terminal (or Warp) |
| Nerd Font | brew install --cask | zip into ~/.local/share/fonts + fc-cache | zip → Install |
| Shell theme | Oh My Zsh + p10k | Oh My Zsh + p10k | inside WSL2 only |
| omp | brew install can1357/tap/omp | curl -fsSL https://omp.sh/install | sh | irm https://omp.sh/install.ps1 | iex |
What a harness is
If you’ve only used LLMs through a chat window, this is the missing piece. A model on its own is text in, text out. It doesn’t read your repository, doesn’t run commands, doesn’t remember last week. The harness is the program around it that turns it into an agent:
- The agent loop. The model asks for a tool call, the harness runs it and feeds the result back, and this repeats until the task is done.
- The tools. Reading and editing files, a shell, search, a browser, MCP servers.
- What goes into the context. The system prompt, project rules (
AGENTS.md), skills, memory, file contents, and compaction when the context fills up. - Permissions and approvals. What runs on its own and what needs your “ok”.
- Sessions and history. Picking up where you left off.
- Sub-agents and orchestration. Splitting work across several agents (in omp, that includes
/vibe). - Model routing. A strong model to think, a cheap one for the grunt work.
Think of a console: the model is the CPU; the harness is everything else, the controller, the memory card and the disc drive.
In practice, the agent acts instead of suggesting: it runs the command and reads the output, no copy-pasting on your end. It keeps state across a long task. And rules, skills and project context make the agent follow your method every time, without you pasting the same instructions into every conversation. Parallel work becomes sub-agents or workers. In my experience, the same model feels like a different one depending on the harness’s tools and how it handles context.
What it does not do: it doesn’t replace judgement, and it doesn’t make a bad model good.
| Aspect | Chat | Harness |
|---|---|---|
| Runs commands | no | yes, with configurable approval |
| Edits files | you copy and paste | straight to disk |
| Project rules | you paste them every time | loaded automatically |
| Parallel agents | no | sub-agents and workers |
| Model choice | whatever the app offers | any provider, one per job |
Examples of the category: Claude Code, Codex CLI, opencode, Aider, Cursor’s agent, and omp.
Why omp
For me, omp wins by putting all of that in one place: dozens of providers (via environment variables, OAuth login or any compatible gateway), local models detected automatically, model roles with a thinking level per role, sub-agents you can customise in markdown, /vibe, skills, memory across sessions, MCP, approval modes, secret obfuscation, isolated profiles and resumable sessions. And it looks good in the terminal, which is half of this post.
1. Prerequisites and terminal
omp needs no runtime: Homebrew and the official scripts ship a prebuilt binary. Bun (≥ 1.3.14, per the README) only matters if you’d rather install with bun install -g @oh-my-pi/pi-coding-agent.
The terminal has to accept a custom font. On macOS I use Warp, which also has Linux and Windows builds. On Windows, the sensible default is Windows Terminal.
macOS (Homebrew, official command from brew.sh, and Warp)
/bin/bash -c "$(curl -fsSL https://raw.githubusercontent.com/Homebrew/install/HEAD/install.sh)"
brew install --cask warp
Linux (the basics the next steps use; terminal: Warp from its site, or whatever you already use)
sudo apt update && sudo apt install -y curl git unzip fontconfigWindows (PowerShell; Windows Terminal is also on the Microsoft Store)
winget install --id Microsoft.WindowsTerminal -e2. Nerd Font
A Nerd Font is a programming font patched with thousands of extra icons: the git logo, folders, powerline arrows, spinners. omp uses those icons when you turn on symbolPreset: nerd, its status line has a nerd preset, and the Powerlevel10k prompt in step 3 relies on them too. Without the font, the icons turn into little boxes.
I use JetBrains Mono Nerd Font, in the NL variant (no ligatures), whose family name is JetBrainsMonoNL Nerd Font.
macOS
brew install --cask font-jetbrains-mono-nerd-fontLinux (the nerd-fonts project’s manual method; fc-list confirms it)
mkdir -p ~/.local/share/fonts
curl -fsSLo /tmp/JetBrainsMono.zip \
  https://github.com/ryanoasis/nerd-fonts/releases/latest/download/JetBrainsMono.zip
unzip -oq /tmp/JetBrainsMono.zip -d ~/.local/share/fonts/JetBrainsMono
fc-cache -fv
fc-list | grep -i "JetBrainsMonoNL Nerd Font"
On Arch, the official package is sudo pacman -S ttf-jetbrains-mono-nerd.
Windows (download JetBrainsMono.zip from github.com/ryanoasis/nerd-fonts/releases/latest, extract it, select the .ttf files and right-click → Install). Then, in Windows Terminal’s settings.json (Settings with Shift held), set the font for every profile under profiles.defaults:
{
  "profiles": {
    "defaults": {
      "font": { "face": "JetBrainsMonoNL Nerd Font", "size": 13 }
    }
  }
}
If you use WSL2, install the font on Windows: Windows Terminal draws the icons, not Linux.
Pick it in the terminal. In Warp (any OS), choose JetBrainsMonoNL Nerd Font in the appearance settings. On macOS my ~/.warp/settings.toml looks like this:
[appearance.text]
font_family = "JetBrainsMonoNL Nerd Font"
font_size = 13.0

[appearance.themes]
theme = "dark"

[appearance.cursor]
cursor_display_type = "bar"
In any other terminal (iTerm2, Ghostty, Kitty, GNOME Terminal…) the principle is the same: the terminal font has to be a Nerd Font.
3. The shell’s look (optional)
I use Oh My Zsh with the Powerlevel10k theme. omp doesn’t need it, but it’s part of how my terminal looks. Zsh, Oh My Zsh and p10k are Unix-shell things: on Windows they work inside WSL2, not in PowerShell.
macOS: zsh is already the default shell; nothing to install.
Linux (and Windows inside WSL2: install it with wsl --install in an administrator PowerShell, reboot, open Ubuntu and continue from here)
sudo apt install -y zsh git curl
chsh -s "$(which zsh)"   # takes effect on your next login
macOS, Linux and WSL2: from here on it’s the same. Oh My Zsh, then Powerlevel10k as its theme, with the commands from the official READMEs:
sh -c "$(curl -fsSL https://raw.githubusercontent.com/ohmyzsh/ohmyzsh/master/tools/install.sh)"
git clone --depth=1 https://github.com/romkatv/powerlevel10k.git \
  "${ZSH_CUSTOM:-$HOME/.oh-my-zsh/custom}/themes/powerlevel10k"
In ~/.zshrc, switch the theme (I keep only the git plugin):
ZSH_THEME="powerlevel10k/powerlevel10k"
plugins=(git)
Open a new terminal; the wizard starts on its own. If it doesn’t, run p10k configure. My picks were nerdfont-v3 + powerline, small icons, rainbow style, 24h clock, angled separators, two lines, transient prompt and instant prompt. The wizard writes everything to ~/.p10k.zsh. In Warp, the p10k prompt only shows up with honor_ps1 = true under [terminal.input].
4. Installing omp
macOS (how I install it)
brew install can1357/tap/ompLinux (official script; installs to ~/.local/bin, which has to be on your PATH)
curl -fsSL https://omp.sh/install | sh
export PATH="$HOME/.local/bin:$PATH"   # put this in ~/.zshrc or ~/.bashrc
Windows (PowerShell, official script; inside WSL2, use the Linux command)
irm https://omp.sh/install.ps1 | iexOn any OS, check with omp --version. omp setup runs the onboarding wizard; after that, just run omp inside a project. Everything user-level lives in ~/.omp/agent/ (omp config path shows where): config.yml, models.yml, mcp.json, .env, skills/, agents/.
A provider. OAuth (subscription) is the same everywhere: omp login and pick from the list (inside a session, /login). For an API key, keep it out of your shell history:
macOS and Linux (works in zsh and bash)
printf 'API key: ' && read -rs K && printf '\nANTHROPIC_API_KEY=%s\n' "$K" >> ~/.omp/agent/.env && unset K
chmod 600 ~/.omp/agent/.env
omp models   # what's available now, grouped by provider
Windows (PowerShell 7.1+; stores a user environment variable that applies to new terminals)
$k = Read-Host 'API key' -MaskInput
[Environment]::SetEnvironmentVariable('ANTHROPIC_API_KEY', $k, 'User')
Remove-Variable k
omp reads OPENAI_API_KEY, GEMINI_API_KEY, OPENROUTER_API_KEY, DEEPSEEK_API_KEY and many more; omp --help lists the main ones.
5. Making omp look good
From here to the end, everything is the same on all three OSes: it’s omp config, not OS config. The look lives in ~/.omp/agent/config.yml. These are the values I changed from the defaults:
# ~/.omp/agent/config.yml — appearance
theme:
  dark: dark-dracula # built-in theme (default: titanium)
symbolPreset: nerd # Nerd Font icons (default: unicode)
statusLine:
  preset: nerd # icons in the status line (default: default)
  contextLine: annotated # annotated context usage
composer:
  shape: box # editor in a box (default: band)
display:
  showTokenUsage: true # tokens per reply
  showTurnTime: true # total time per turn, tool calls included
Or from the CLI, one key at a time (the name has to match the schema exactly):
omp config set theme.dark dark-dracula
omp config set symbolPreset nerd
omp config set statusLine.preset nerd
omp config set statusLine.contextLine annotated
omp config set composer.shape box
omp config set display.showTokenUsage true
omp config set display.showTurnTime true
All of this is also in /settings inside a session, if you prefer a menu. The other statusLine.preset options are default, minimal, compact, full, ascii and custom. The separator lives in statusLine.separator (powerline, powerline-thin, slash, pipe, block, none, ascii). Custom themes are JSON files in ~/.omp/agent/themes/.
Expected result: when you open omp, the editor sits in a box, the status line shows the model, folder and git state with icons, and the colours are Dracula’s. If you see little boxes, the font from step 2 isn’t selected.
6. Settings worth changing beyond looks
Mine, all of them off the defaults:
| Key | Value | What it does |
|---|---|---|
defaultThinkingLevel | max | default reasoning depth (default: high) |
temperature | 0.7 | sampling temperature (default: the provider’s) |
memory.backend | local | extracts lessons from sessions and injects a summary into the next one (default: off) |
autolearn.enabled | true | lets the agent create and update managed skills |
autolearn.autoContinue | true | runs a private lesson-capture turn when it stops; costs tokens |
model.loopGuard.enabled | false | turns off automatic loop detection on reasoning and prose |
model.toolCallLoopGuard.threshold | 20 | identical calls in a row before it steps in (default: 5) |
bash.allowCompoundCommands | true | evaluates each command in an && chain separately |
browser.headless | false | shows the window when the agent uses the browser |
computer.enabled | true | enables desktop control (screenshots, input) |
Two I recommend to everyone, even though they’re not on my list:
secrets.enabled: true(defaultfalse): credential-looking env vars and known patterns (JWTs, Bearer headers, cloud keys) become placeholders in the text sent to the provider and are restored right before a tool runs. It doesn’t catch short values or the static prompt.tools.approvalMode: the default isyolo(everything runs). If you’re starting out,writeapproves reads and writes and asks before executing. Sub-agents always run inyolo; the approval that counts is the parent’s.
7. Providers and models
omp works with roles, set under modelRoles in config.yml:
| Role | Used for |
|---|---|
default | the main conversation |
smol | light tasks; /vibe fast workers |
slow | heavy reasoning |
plan | plan mode (/plan) |
task | sub-agents and /vibe good workers |
vision | image analysis |
commit | omp commit |
tiny / memory | session titles and the memory pipeline |
A :level suffix sets the thinking level per role (off, minimal, low, medium, high, xhigh, max, auto): default: deepseek/deepseek-v4-flash:max. Unset smol and slow inherit default. To switch: /model opens the hub, Ctrl+P cycles through the role models, Shift+Tab cycles the thinking level, and omp --model opus does fuzzy matching.
Your own gateway (any OpenAI- or Anthropic-compatible endpoint) goes in ~/.omp/agent/models.yml:
providers:
  my-gateway:
    baseUrl: https://gateway.example/v1
    api: openai-completions # or anthropic-messages, openai-responses…
    apiKey: MY_GATEWAY_API_KEY # name of an env var; omp uses its value
    authHeader: true # Authorization: Bearer <key>
    models:
      - id: vendor/big-model # the id the endpoint expects
        name: Big Model
        reasoning: true
        thinking: { mode: effort, efforts: [low, high, max], defaultLevel: high }
        input: [text, image]
        contextWindow: 1048576
        maxTokens: 131072
apiKey means “env var name or literal”: if it matches a non-empty variable, that value is used. A YAML error makes omp skip the whole file, so always check with omp models my-gateway. And before declaring a provider, run omp models <name>: if it’s already built in, all you need is the credential.
What I use:
defaultrole:deepseek/deepseek-v4-flash:max, through the built-in DeepSeek provider. Everything that inheritsdefault(thefastworkers, for example) runs on it.- Main session and
/vibedirector: Claude Opus (anthropic/claude-opus-5-5). omp lets you switch just the session’s model without touching thedefaultrole: Alt+P picks a temporary model for the session, andomp --model opusdoes the same from the command line. - A gateway in
models.ymlwith DeepSeek V4.1 Flash, Nemotron 3.5 Super VL 120B and GLM-5.3 Flash, all with a 1M context, their effort ladders declared and costs filled in so omp can track spend.
8. /vibe
/vibe turns the session into a director. The director keeps only read, an optional todo and five control tools; the searching, editing and running is done by persistent workers in the background, each with its own transcript.
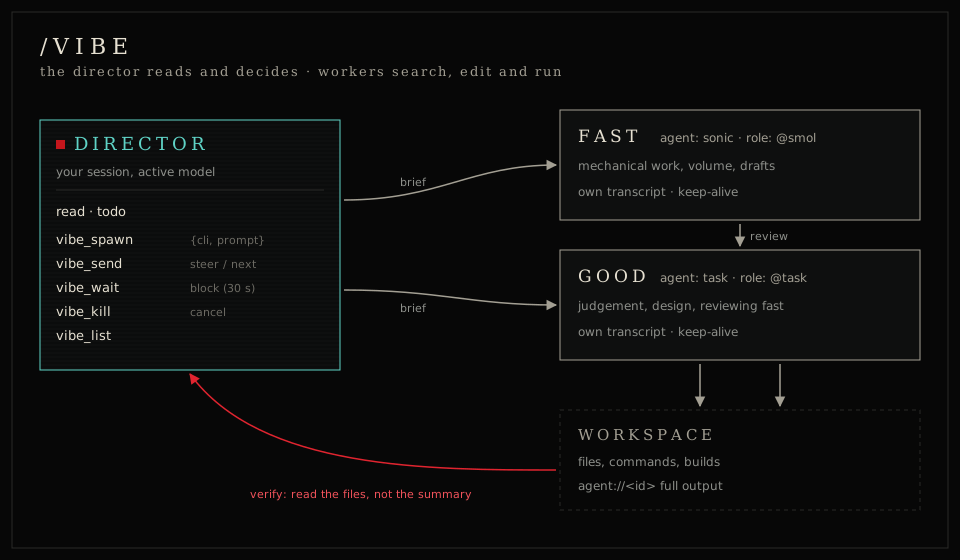
/vibe                       # enter the mode
/vibe migrate the parser    # enter and send the first directive
/vibe # exit (shuts the workers down)| Tier | Agent | Role | Use for |
|---|---|---|---|
| fast | sonic | @smol | mechanical execution, volume, drafts |
| good | task | @task | judgement, design, reviewing fast output |
The director uses vibe_spawn (creates a worker with a brief and a tier), vibe_send (steers or sends the next step), vibe_wait, vibe_kill and vibe_list. You just talk to it in plain language.
To pick the tier models, the docs suggest aliases:
task:
  agentModelOverrides:
    sonic: '@fast_worker'
    task: '@good_worker'
modelRoles:
  fast_worker: my-gateway/vendor/fast-model
  good_worker: my-gateway/vendor/big-model:high
That override applies to every sonic and task sub-agent, not just /vibe. I didn’t configure any of it: fast inherits default (DeepSeek V4 Flash) and good falls back to the director’s active model (Opus). Cheap grunt work, expensive judgement.
How to brief. A worker can’t see the director’s conversation. Give it files, constraints and an acceptance criterion you can check:
Goal: cursor pagination on GET /api/orders.
Files: src/api/orders.ts, tests/orders.test.ts. Don't touch anything else.
Acceptance: `npm test -- orders` passes, with a new test for the last page.
Deliver: the files you touched and the test output.
How to verify. The docs say it plainly: a worker finishing means the turn ended, not that it got things right. The director reads the touched files and the full output at agent://<id>. One worker per workstream, fast and good in parallel, and good reviewing fast when it matters.
Pitfalls: exiting /vibe shuts down every worker; it doesn’t mix with plan mode or goal mode; while it’s on, you can’t start, delete, fork or move the session. This post, by the way, was drafted by an omp worker in a director session.
9. Skills, MCP and AGENTS.md
- AGENTS.md: omp loads
~/.omp/agent/AGENTS.md,.omp/AGENTS.md, and a plainAGENTS.mdsearched from the current directory up to the repo root (it readsCLAUDE.mdtoo). Keep it short: hard rules, and where everything else lives. - Skills: a directory with a
SKILL.md(nameanddescriptionin the frontmatter). Only the name and description go into the prompt; the body loads on demand (skill://<name>). Yours live in~/.omp/agent/skills/; withautolearn, the agent writes its own into~/.omp/agent/managed-skills/. I have about 30 of mine (vulnerability classes, methodology, triage, report writing) and dozens of managed ones. - MCP:
~/.omp/agent/mcp.json, with${VAR}expanded. I use Burp Suite through PortSwigger’s official MCP Server extension (local SSE, by default athttp://127.0.0.1:9876), and a private knowledge base, a Python MCP server over my notes:
{
  "mcpServers": {
    "burp": { "type": "sse", "url": "http://127.0.0.1:9876" },
    "kb": {
      "type": "stdio",
      "command": "${HOME}/kb/.venv/bin/python",
      "args": ["${HOME}/kb/server.py"],
      "env": { "KB_PATH": "${HOME}/kb/data" }
    }
  }
}
10. A taste: bug bounty
For large programs I open several terminals running omp, each with one role, and they talk only through the filesystem. I call it the pack: an orch owns scope and the queue, attackers a1..aN take one host at a time, and a triage validates candidates. Every shared write goes through a bash script, bin/hb:
~/hunting/
├── PROTOCOL.md            # the contract: roles, lease, rate, proof
├── bin/hb                 # the bus
├── scope/<program>/       # eligible.txt, deny.txt
└── state/
    ├── queue.jsonl        # append-only queue
    ├── claims/<host>/     # lease via atomic mkdir (owner + epoch)
    ├── findings.jsonl     # everything starts as "candidate"
    ├── dead-ends.md       # verified negatives + the control used
    ├── intel.md           # reusable patterns: "[tag] fact → action"
    └── loot/F-0001/       # request.txt, response.txt
An attacker’s loop:
HOST=$(bin/hb next a1) || exit 0     # atomic lease on the next host
bin/hb inscope "$HOST" || { bin/hb release "$HOST" a1; exit 3; }
grep -i "$HOST" state/dead-ends.md state/intel.md   # don't repeat dead tests
ffuf -u "https://$HOST/FUZZ" -w wordlists/base.txt -ac -rate 20 -t 10 -o "recon/$HOST/ffuf.json"
bin/hb finding a1 "$HOST" idor "https://$HOST/api/orders?id=2" "BOLA on /orders" "200 with account B's order"
bin/hb done "$HOST" a1 findings "1 candidate"
The guardrails are executable, not promises from the model:
- Scope:
hb inscopeexits0,2or3; deny beats allow; unlisted hosts don’t get touched. - Rate limits: an explicit cap per tool, manual requests at 1/s per host, and a burst of 403/429 pauses the host for 10 minutes.
- Proof before claims: without request and response in
state/loot/, it’s only a candidate. Triage reproduces from scratch with a negative control, on a model from a different family. - Human review: the agent can draft the report, but the manual reproduction, the review and the submission are mine.
That deserves a post of its own. Next time.
Wrapping up
A harness won’t think for you, but it makes your method run the same way every time, in a terminal that’s nice to look at. Recap:
- A terminal with a configurable font: Warp (macOS/Linux/Windows) or Windows Terminal.
- JetBrainsMono Nerd Font:
brew install --caskon macOS, zip +fc-cacheon Linux, zip → Install on Windows; selected in the terminal. - (Optional) zsh + Oh My Zsh + Powerlevel10k,
p10k configure(on Windows, inside WSL2). - omp:
brew install can1357/tap/omp,curl -fsSL https://omp.sh/install | shorirm https://omp.sh/install.ps1 | iex; thenomp setupandomp loginor an API key. - Theme and icons:
theme.dark,symbolPreset,statusLine.preset,composer.shape. - Memory, secrets and approvals.
- Model roles and, if you need it, a gateway in
models.yml. /vibeonce the basics are boringly reliable.